Using OsmAnd+ for long-distance cycling
 Just as Hoover came to define vacuum cleaners, Garmin has unfortunately become synonymous with GPS navigator for bikes. To the irritating extent that one of my riding groups recently announced Garmins are mandatory on this ride. As Andy Matthews said in an excellent blog post
 Garmin are a lazy company … They’ve largely captured the market for cycling computers and seemingly not through excellence but from being first to market and being good enough
. Caroline and I have collectively owned five Garmin devices and experienced the highs and lows: liberation from the stress and delays of navigating with paper maps, but numerous irritations such as random reboots, confusingly different and proprietary file formats, unreliable navigation, limited configurability.
Entering the 2016 Transcontinental Race (a single-stage continuous bike race from Flanders to Gallipoli where the clock never stops) prompted me to re-evaluate. In theory a smartphone with OpenStreetMap and a decent mapping application should be capable of overcoming many of these limitations and providing a much better navigation experience. But, as Yogi Berra said, the difference between theory and practice is that in theory there’s no difference but in practice there is.
I identified my requirements:
- Ability to follow a pre-planned route. For TCR, Audax, tours and indeed most of my training rides, I plan in advance and create GPX files with tools such as bikehike and brouter. The main use case is simply to keep me following the planned route.
- Ability to navigate on demand to off-route locations. In TCR I expected I would need to find hotels, food stops, bike shops which might be somewhat off-route. I want to be able to rely on the mapping app to choose a fast, bike-suitable route for these relatively short deviations from my planned route.
- A database of relevant points of interest. Bike shops, supermarkets, fuel stations, restaurants; bonus points for hours of operation (I relied on 24-hour fuel stations for food and drink).
- Clear, simple map display, easy to control on the move (e.g. change zoom and map orientation)
- Easy access to good quality maps for all of Europe.
- Able to record a ride and easily upload to Strava over the air.
- Physically robust and able to survive heavy rain – Garmin’s trump card; ours have survived several high-speed falls from the bike, and when the rain comes down, we’ll be far more anxious about covering ourselves with waterproofs than covering the Garmins.
- Ability to ride 15 hours a day without battery worries.
I chose to use the Android app OsmAnd+ on a Motorola Moto G (3rd gen) phone, but carried a Garmin Edge 605 as backup. The good news is that OsmAnd led me through several long Audaxes including the 600km Brimstone in May, a 1,700km tour along the Rhine in June, successful completion of the Transcontinental in August (3,800km in 16 days). OsmAnd has its own quirks, and can be a little daunting at first, but it was the single most valuable piece of kit I carried on that long ride from Geraardsbergen to Çanakkale. OsmAnd never failed and the Garmin remained turned off in my bag.
This piece explains my thought process in selecting OsmAnd and Moto G3, details how I used it, and highlights some of the quirks and areas for improvement. I’ve shared an album of screen shots that show, in some detail, the step-by-step process of installing, configuring and using OsmAnd. I’ve included a few key screen shots directly in this post.
I should perhaps say: I am a techie, I’m not daunted by more complex technology, and perhaps my preference for OsmAnd reflects this. Nonetheless I want to try and make this description as clear and complete as I can, because I feel OsmAnd really rewards the effort to install and learn to use it.
The device
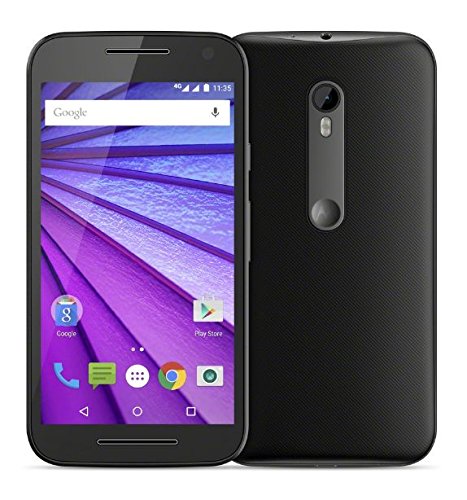 I have no knowledge of, or interest in iPhones, so for me it’s an Android. Water-resistant Android phones are becoming far more common. There are self-consciously ruggedised models, including some pretty cheap Chinese brands. There are high-end models such as Sony Experia Z3, which make a song and dance about their water-resistance and have received good feedback from other TCR finishers including Simon Romaine. I chose a Moto G 3rd Generation because I could justify £150 to update my phone even with the risk it wouldn’t meet the more stringent requirements as a navigation device. It’s allegedly IPX7 rated, meaning it can be dunked in up to one metre of water for up to 30 minutes (with videos to demonstrate). In a lab perhaps, but I was far from confident in real-life conditions. But so far, so good. [Update: the new, 4th gen Moto G no longer has the IPX7 water-resistance rating. My guess is the design hasn’t changed but Motorola is taking a more cautious stance, perhaps due to warranty claims. But you may want to consider alternatives which advertise water-resistance. A helpful commenter here, Jacek, recommends a very different approach, an Android watch.]
If you are planning on riding across Europe, you’ll need plenty of storage space for maps, stored tracks and photos, so I’d suggest getting a phone that will allow you to plug in an SD card. My Moto G3 came with 16GB internal storage, which I use mainly for installed apps, and I plugged in a 32GB SD card. Maybe overkill, but it only cost £10 so why worry.
The mapping software
I was already happily using OpenStreetMap maps on the Garmin so I had no hesitation in choosing them for TCR. For those who don’t know, OSM is the Wikipedia of mapping; it’s compiled through the contributions of volunteers. Mapping coverage was faultless, even throughout the Balkan phase of TCR (I crossed Croatia, Bosnia, Montenegro, Kosovo, Macedonia). Oddly enough, the only place I’ve found a few gaps in OSM mapping was in deepest mid-Wales, when I followed-up TCR with Mike Hall’s Valleycat in September. Of course OSM encourages you to correct any errors and we’ve fixed one or two.
OsmAnd stores maps offline so you have no dependence on mobile/Wifi network coverage when you’re on the road. It’s super-easy to download new countries or regions, just click on each of them while you are on-network and wait… they are quite large files: For TCR, I carried 3.3GB of maps for 16 countries (including some contingency countries off my planned route; be prepared!). Smaller countries tend to be packaged as a single map file, larger ones have a file per region, so I ended up with 43 map files. The free version of OsmAnd is limited to 10 downloads (maps, voice files, etc.). So if you only want UK maps you might be able to get by with the free version of OsmAnd, but the paid version (designated OsmAnd+ in the Play store) only costs £5.99 so I’d suggest paying up.
I know some TCR riders have had success with downloading offline Google maps. It seems to me a little more awkward than with OsmAnd, but perhaps I’m just not so familiar. The Google mapping is inferior to OSM for cycling, especially regarding details of road surface and status. And when you need a dry place to spend the night in rural France, it’s truly wonderful to locate and navigate to a bus stop using OSM!
By the way OsmAnd is also available for IPhone but I don’t have any personal experience.
Battery life
Two factors dominate battery usage: network usage and illuminating the screen.
I discovered that switching the phone to aeroplane mode led to a vast improvement in battery life. Connecting to the mobile network seems to be very power-consuming, especially in areas of poor coverage, where the phone is often seeking a signal.
As for the screen, I turn off adaptive brightness, and lower the brightness level, normally to one notch above the lowest setting. The map remains perfectly visible on dull days in the UK. In the TCR, in the middle of bright sunny days, I found I needed to turn the brightness up. Adaptive brightness would seem useful to avoid this faff, but I find that it turns the brightness higher than really necessary, even if the manual slider is at its minimum setting. (In an earlier Android version, adaptive brightness also seemed to have a bug whereby the brightness would occasionally be turned down so low as to be invisible; hard then to find the controls to turn it up again! I think that’s now fixed though.)
Together, aeroplane mode and low brightness give me something between six and nine hours turn-by-turn navigation on my Moto G3 with the screen permanently turned on. For best battery life you should also close any unnecessary apps, but I think aeroplane mode and brightness are the two biggies.
For a long time I was convinced I needed the software to be able to turn off the screen when following a continuous road, but wake the screen and alert me when a turn is coming up. OsmAnd can do this, and it would no doubt extend battery life, but here’s the snag. What is straight on? I found I would sometimes miss a turn when the main road curved right, and my fork went straight on. Conversely, spurious bends in the main road are often announced as turns. Too many times I missed an unannounced turn. So I gave up on turning the screen off, except manually when I absolutely knew the road ahead was long and continuous.
Remember my requirement was 15 hours a day without battery worries? We’re some way short of that, with six to nine hours of low brightness-aeroplane mode. I always carry a small USB battery pack, a Zendure A2, which gives me a couple of full phone charges at a cost of 200g extra weight. I also used a Shutter Precision dynamo hooked up to B&M Luxos U light and USB charger. So I can keep either the phone or battery topped up while riding.
A couple of snags to be aware of though:
- In theory the Zendure supports charge-through and I’m pretty sure it did when I first started testing. However I had a near-disaster on Day 1 of TCR, when I found every time I tried to charge-through from the Luxos via Zendure to the phone, the front lamp would come on. Eventually I realised it was fine to charge either phone, or battery pack, but not charge-through both. So no disaster but a slight annoyance. I think the Luxos is probably at fault.
- Charging from dynamo works great on normal days, but alpine climbing days with more than 5,000 meters of ascent are not normal! Because of the long hours at speeds less than 10 km/hour, I wasn’t getting much juice out of the dynamo. I still managed to get through two days riding without need for an additional charge (my pattern was alternate nights in hotels and roadside bivvying). But I was eating into the reserves of my battery pack on those days.
Attaching phone to bike
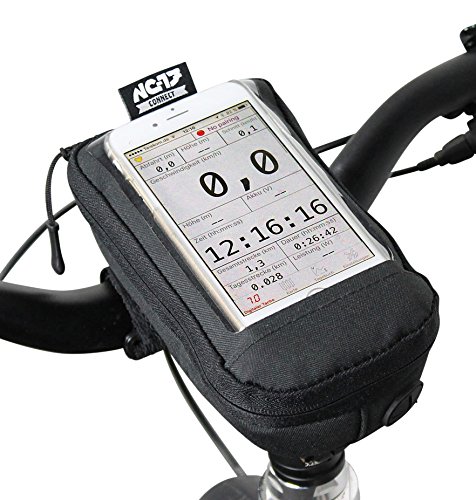 I’ve been using an NC-17 Connect Smartphone Stem Bag for the best part of a year. It’s got a lot of good points and one really bad point. The phone slides into a slim pocket underneath the transparent window. The touch screen works pretty well despite the extra layer of plastic. With practice you can still use the screen on-off switch and volume rocker on the right side of the phone. The larger zippered space under the phone has plenty of room for a battery pack, and it has an opening underneath the bag through which I feed the USB output of the Luxos U, so all the vulnerable electrical interconnects are protected within the bag. My Moto G3 is a tight fit within the bag, especially with a micro-USB charging cable plugged in at the bottom. I had to choose a cable with a short ‘collar’ and even then it has become quite deformed from the pressure of the zipped-up bag. I worried that this would cause a broken connection, but so far no problem.
 The major flaw though is that it’s not at all waterproof. It’s billed as water repellent but the seams leak water like a sieve. And, though the ingress of water caused no apparent damage to the phone (it’s IPX7, remember?), once the bag is saturated, the clear plastic cover gets covered in mist and water droplets and it’s nigh-on impossible to see the screen. The solution, which, though crude, I’m rather proud of, is to carry a hotel shower cap and slap it over the phone at the first drop of rain.
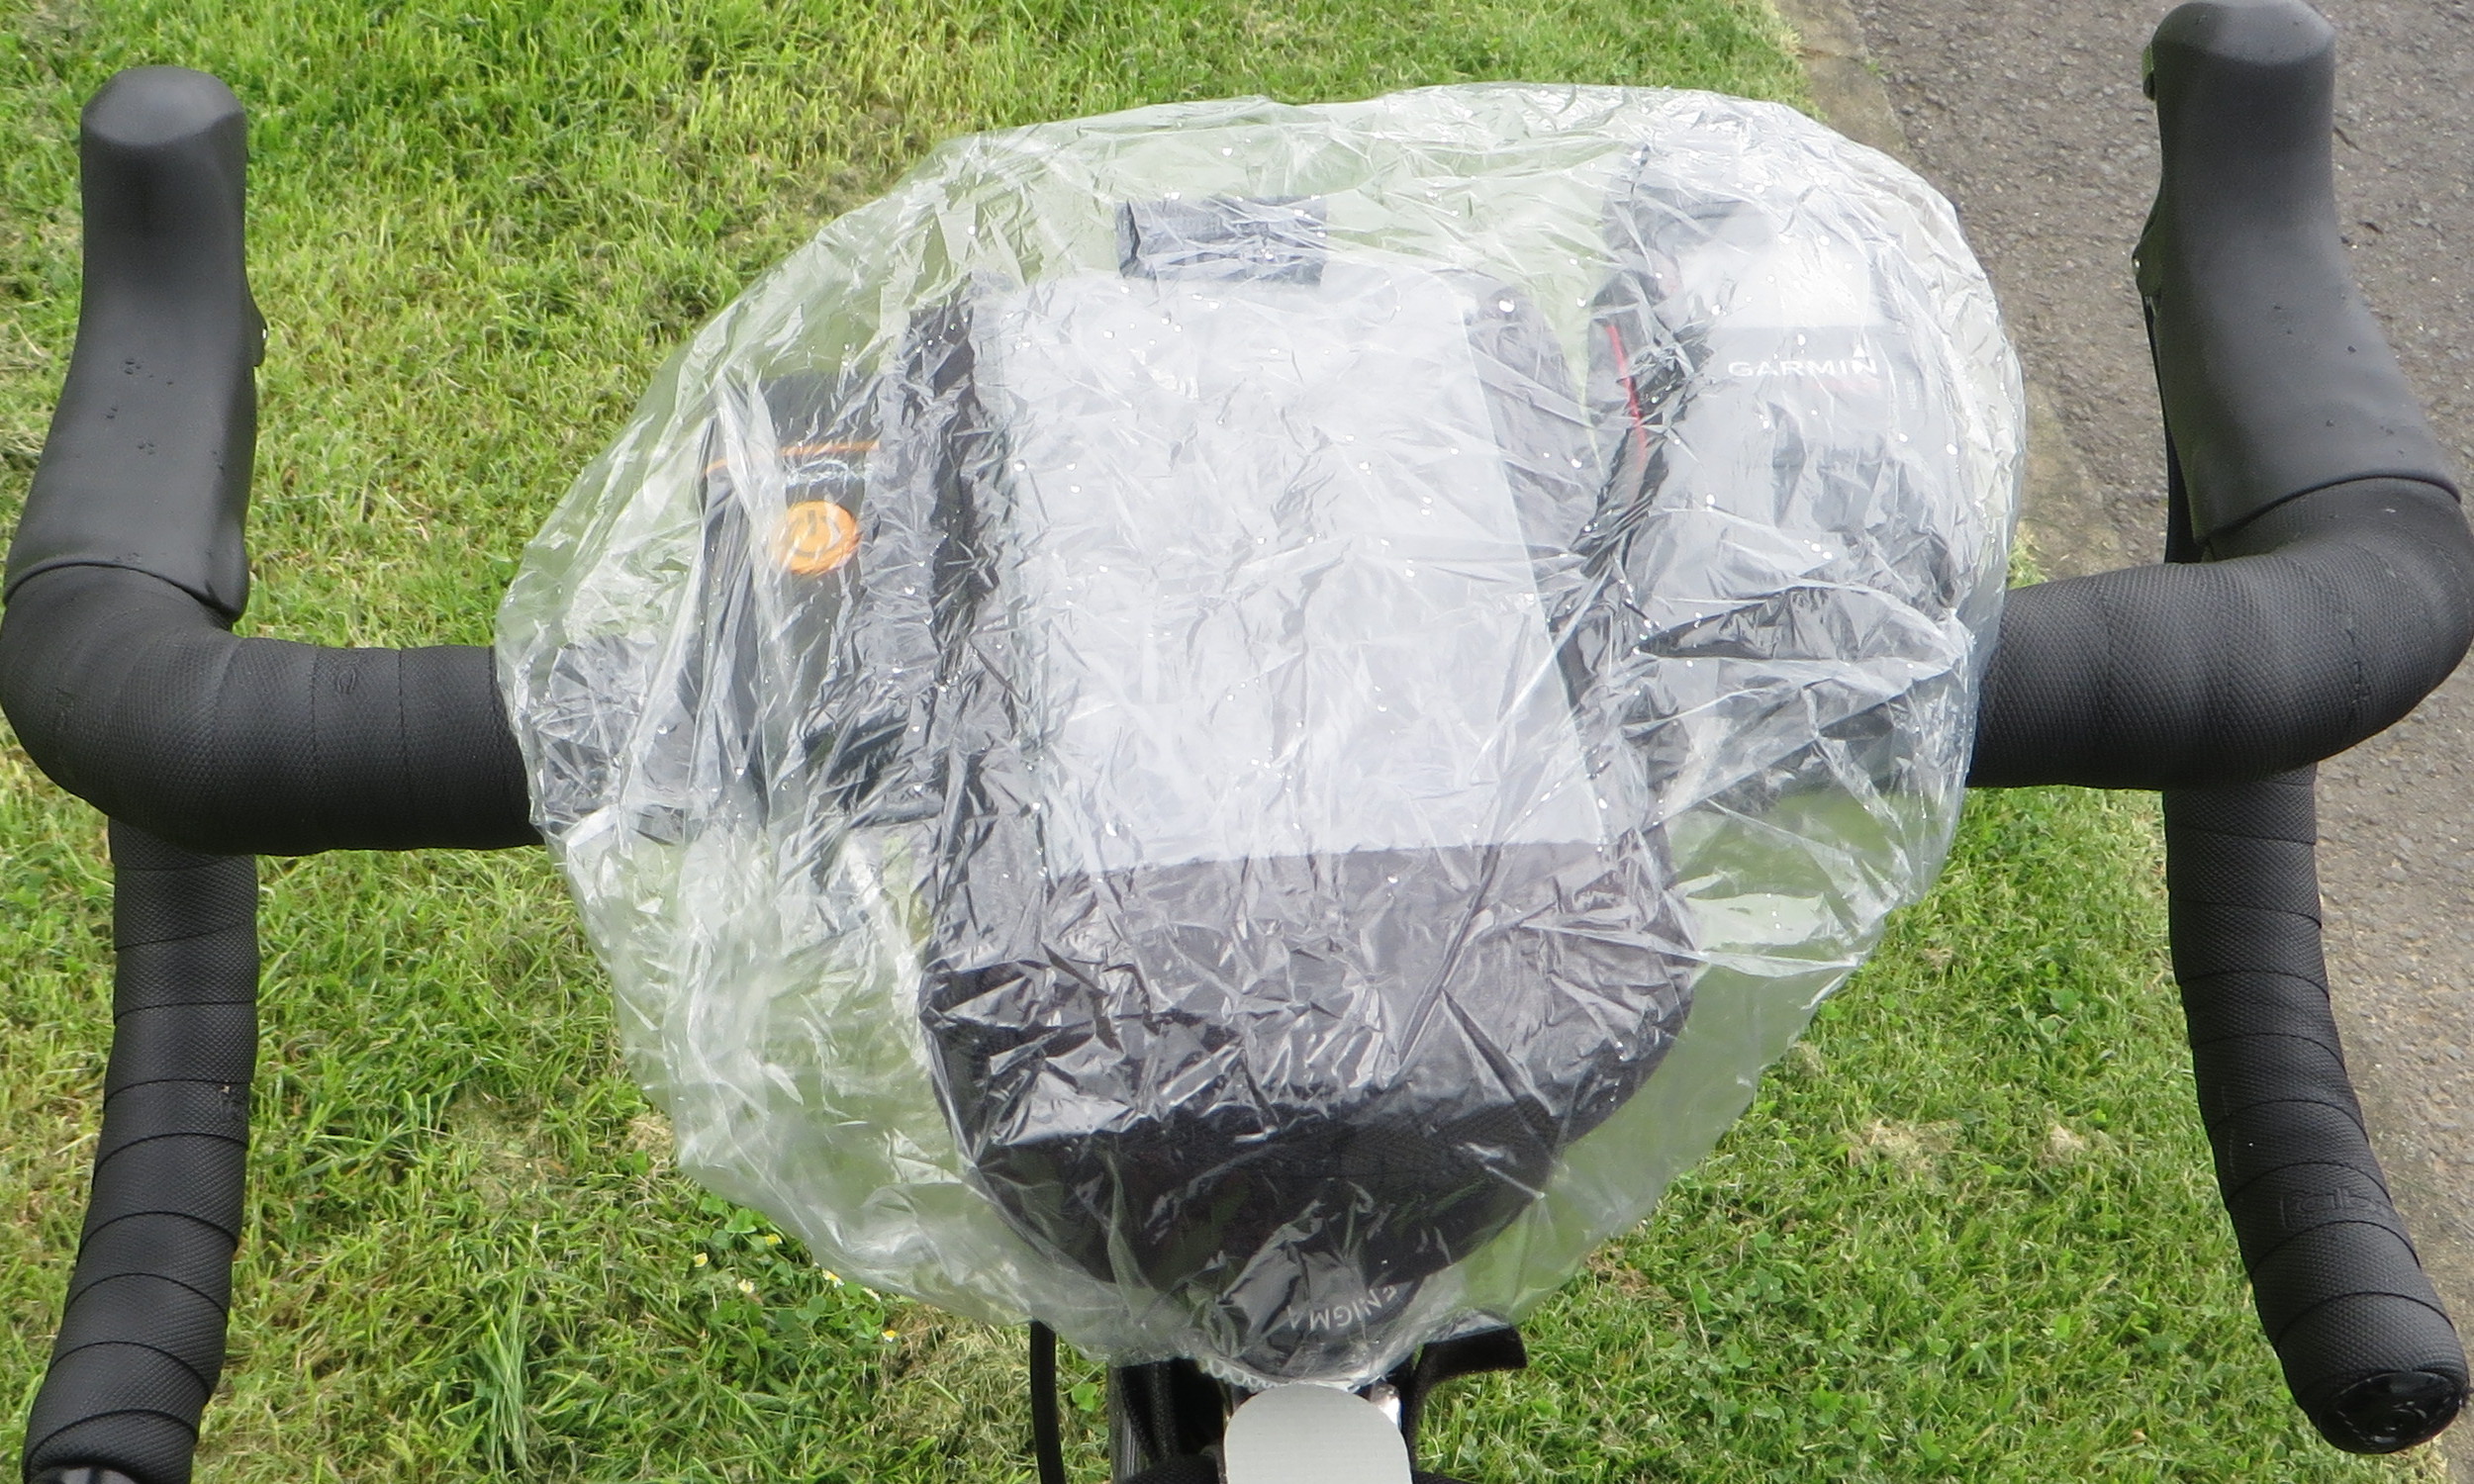
[Update: I now have an Aquapac bike-mounted case. The small size is a tight but satisfactory fit for Moto G 3rd Gen. Reviews consider this decent, but overpriced at full retail price. I got mine for a knock-down price at SportPursuit, so I’m not complaining. I haven’t yet put this to a full test; I will update when I’ve used it on the road for a while.]
If you really trust the waterproofness of the phone, you could use a free-range alternative such as Quad Lock or Finn. These seem a neater solution than my rather ugly stem bag, but on the other hand I’d fear for the vulnerability of charging connections on a wet day.
Installing OsmAnd
The version I’m describing is OsmAnd 2.5.4. It’s a straightforward install from the Play store. You’ll want to do the following from a WiFi network, as it involves downloading a lot of application and map files. I’m going to assume you will install OsmAnd (the free version) first, and you can then later install OsmAnd+ if you want a greater number of maps or the additional features of the paid version. [Update: I discovered while writing this that OsmAnd+ installs as a separate app alongside the free OsmAnd, so if you later pay for OsmAnd+ you would need to repeat the configuration and map download.]
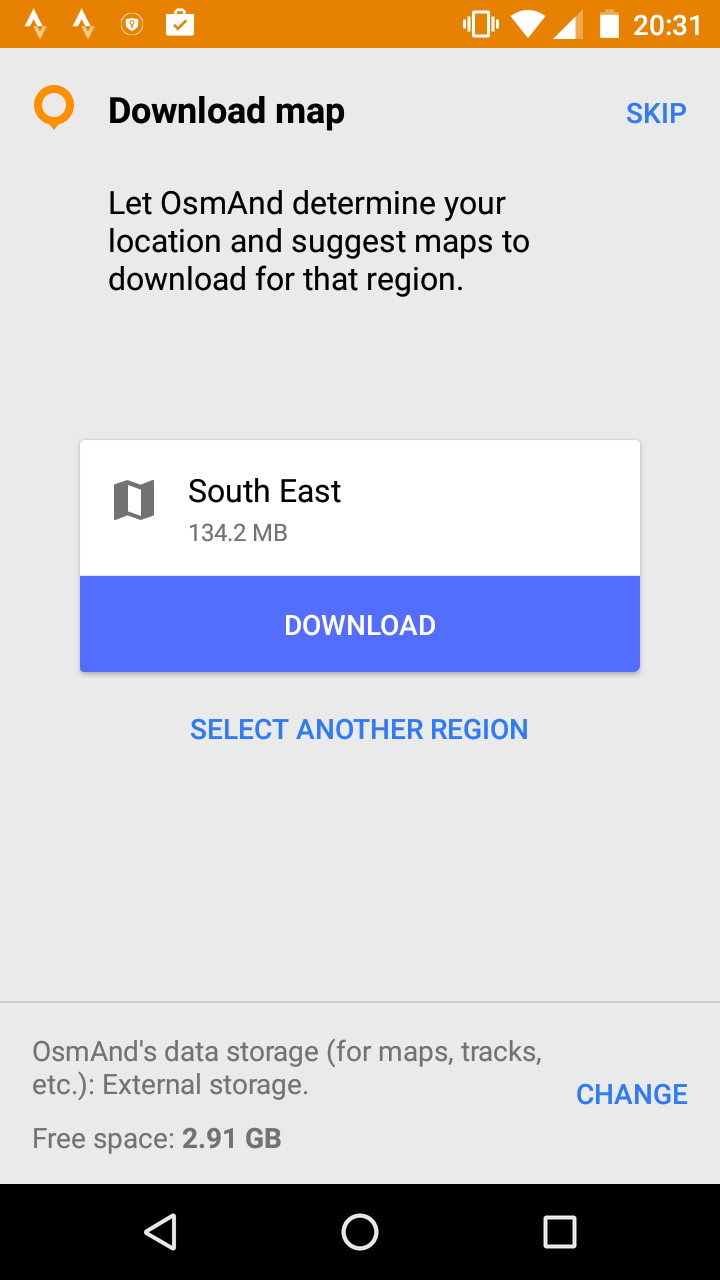 Search for OsmAnd on the Play store, and hit install. When the install completes and you tap the new OsmAnd icon on your home screen, you will be invited to Get Started, and then OsmAnd will detect your location and suggest a first map. Before you download the map, if you have an SD card, I suggest you tap the button at the bottom of the screen to change data storage location. You need to Allow OsmAnd to access photos, media, etc. Choose Memory card as the data storage folder.
You can now tap Download to get your first map. You’ll see your local map, and the World overview map gradually downloading.
When the download has completed you can go to map. You might need to Allow OsmAnd to access this device’s location. You can tap the + icon to zoom in and you should see a detailed map of your local area.
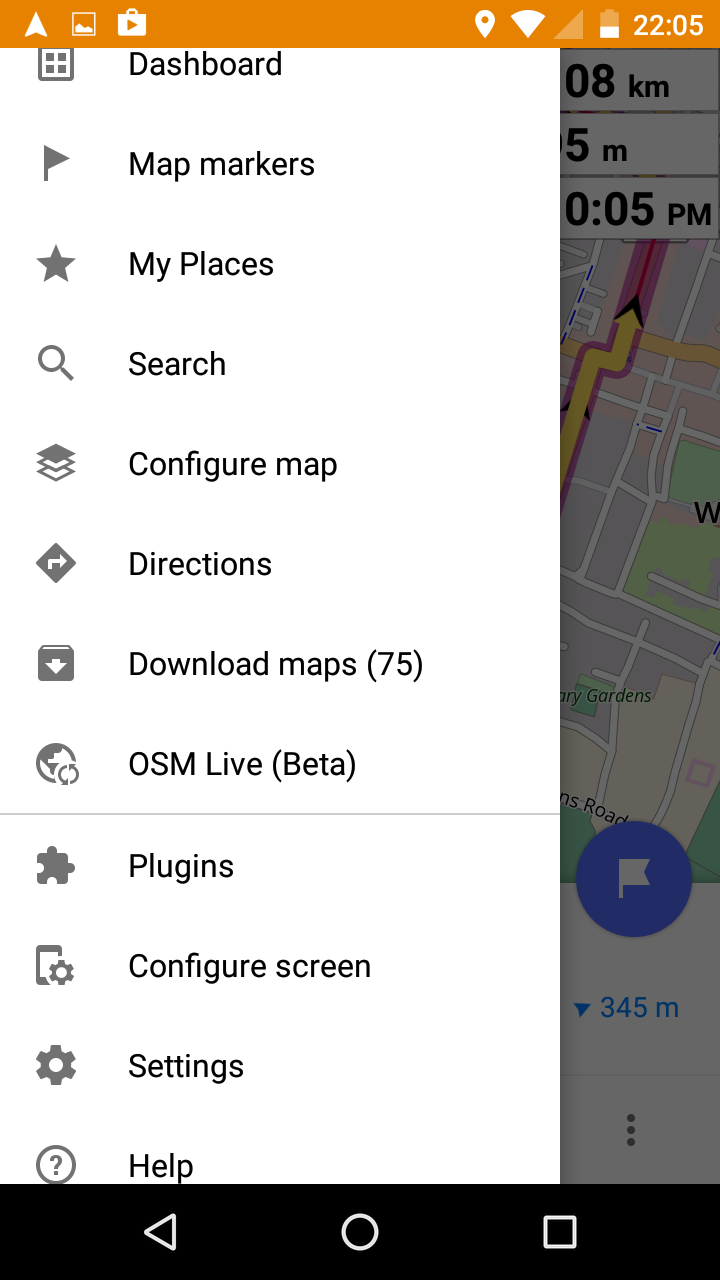 Now is a good time to download voice files if you want to hear turn-by-turn announcements. At the bottom-left you will see an icon with three horizontal bars. Let’s call this the Menu button. If it’s not visible, just tap anywhere on the map and it should appear. Tap Menu then select Download maps (oddly, voice files are downloaded from the same menu as maps). Scroll to the very bottom, where you will see Voice prompts. Text-to-speech (TTS)-synthesised voices are recommended by OsmAnd. There are many TTS language options, including English and English (UK). Sadly the English (UK) option actually has a US accent. Tap the down-arrow on the right to download your chosen TTS language. Alternatively you can choose Voice prompts (recorded), and under this there is a UK English voice, which has a nicer accent, but is a bit staccato. By all means install several voice files and see which you prefer. Back-arrow to the map screen when you’ve downloaded your voice files.
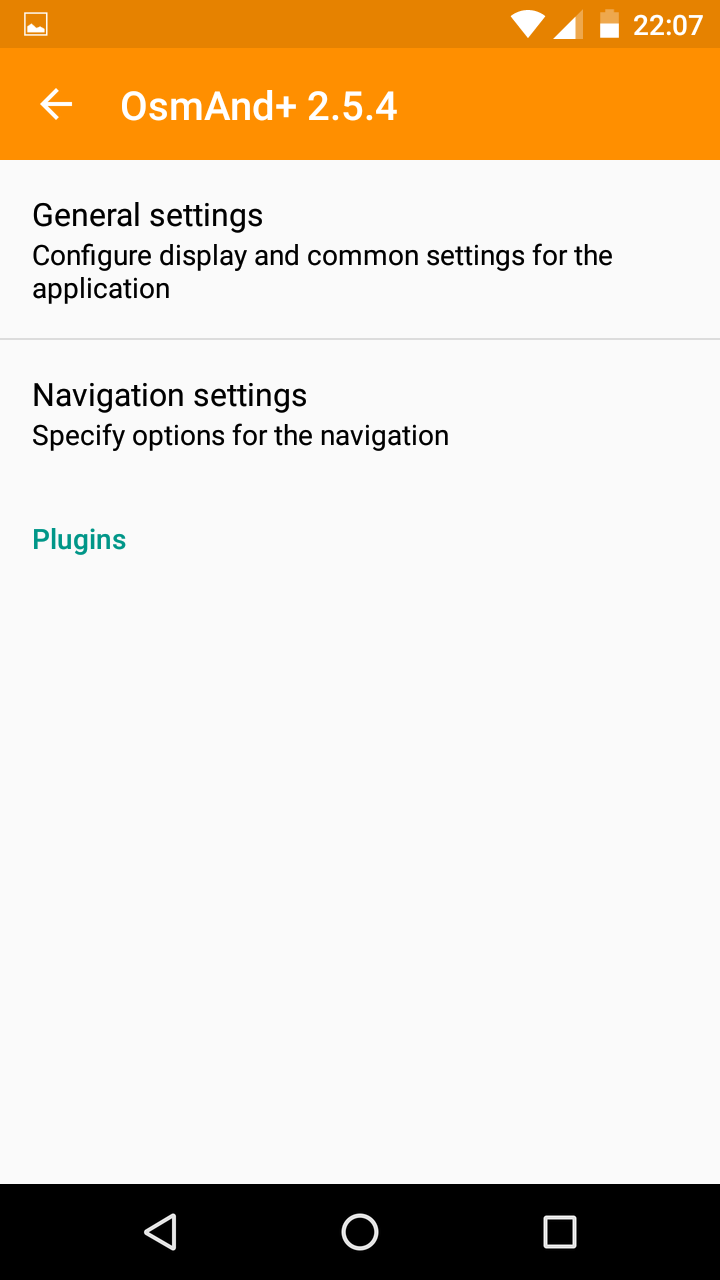 You now probably want to set up defaults for bicycle use. Tap Menu then Settings. On the next screen, tap General settings and then Default profile and finally select Bicycle. Still on the Global app settings screen, scroll down and tap Voice guidance then select your preferred voice file that you recently downloaded.
If you wish you can set personal preferences here, such as language and units of measure. Back-arrow until you get back to the map.
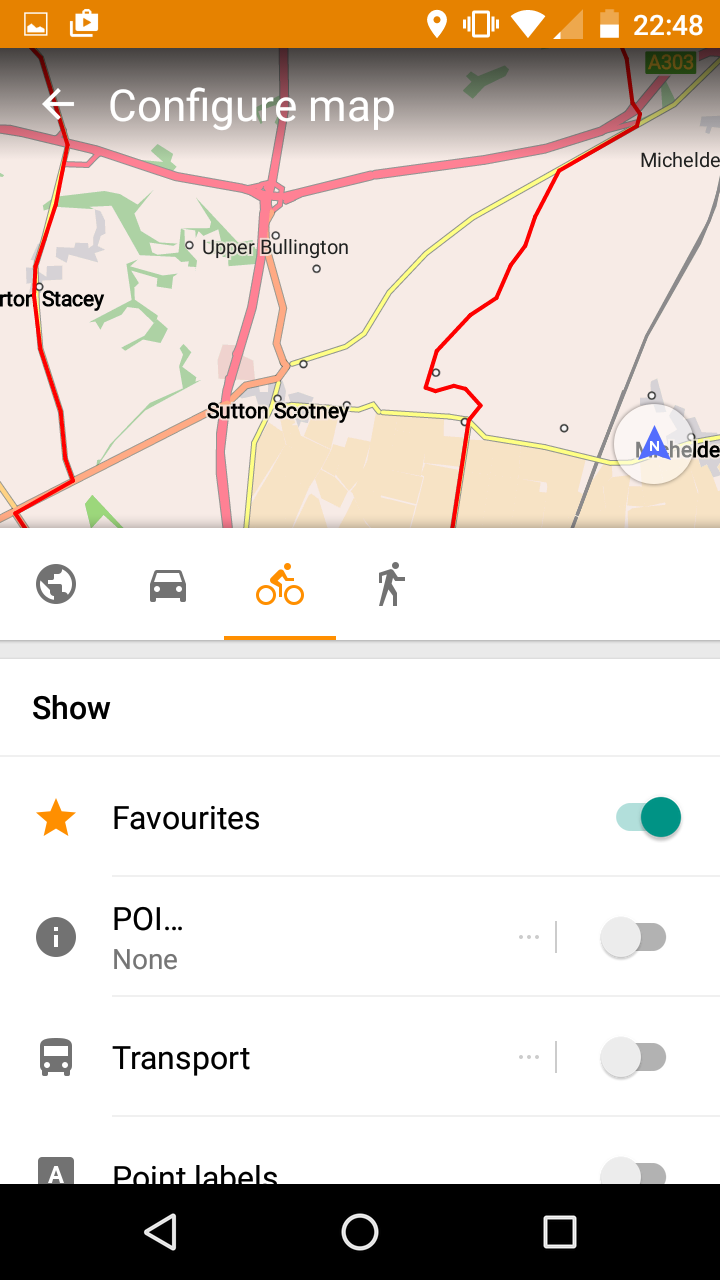 Tap Menu once more, then Configure map. Mid-way down the Configure map screen are icons for car, bicycle and walking. If it’s not already highlighted, tap the bike. Scroll down to Map rendering. Your tastes may differ, but I usually switch Map mode to Day; Text size to 75%; Map language to English. Back-arrow to the map screen.
You are now ready to navigate your first route.
Navigating a pre-planned route
I’ll spare you (for now) the details of how I prepared my routes. That will make a whole other blog post. In short though: good routing software that can offer multiple route options and evaluate distance and climbing; meticulous attention to details especially road surface, Google street view and and satellite images. On the whole I was really pleased with my route choices. This section is about how to follow them.
The first aspect is file format. Garmin uses some proprietary file formats such as TCX. Standard GPX flavours include Routes, Waypoints and Tracks that differ in the type of GPX coordinates they use, and how closely-spaced they are (some GPX routes have the points far apart and expect the navigation device or human to fill in the gaps). I experimented with all of these and I find GPX Tracks absolutely the best. This type of file contains GPX track points spaced just a few metres apart, so there are essentially no navigation decisions left for OsmAnd. The tools I typically use to make GPX tracks are brouter and bikehike, but I’m sure many other tools are capable.
Now you need to get the GPX file onto the phone. I’m going to assume you know how to get files onto the phone. Either by plugging the phone into your computer via USB cable. Or, what I do, connect over WiFi to our home network file server and use an app such as ES File Explorer to copy the GPX file from the server to phone. I guess Dropbox would be another way.
Whatever the method, the key thing is to put the GPX file into the folder from which OsmAnd loads tracks. If you have set up OsmAnd to use an SD card for storage, the folder will be:
SD card/Android/data/net.osmand.plus/files/tracks
 Now, from the OsmAnd home screen, tap Menu (bottom left of screen), then Configure map, then GPX track, then tap on the name of the GPX file. A tick should appear on the right of the file name. Then OK at the bottom, and back-arrow to go back the home map screen. Your GPX track should now be visible on the map, perhaps as a red line if you haven’t changed the defaults.
When it comes to riding, you might be happy just to follow the red line. The map should pan as it tracks your current position (if it doesn’t, tap the blue compass icon at the bottom towards the right).
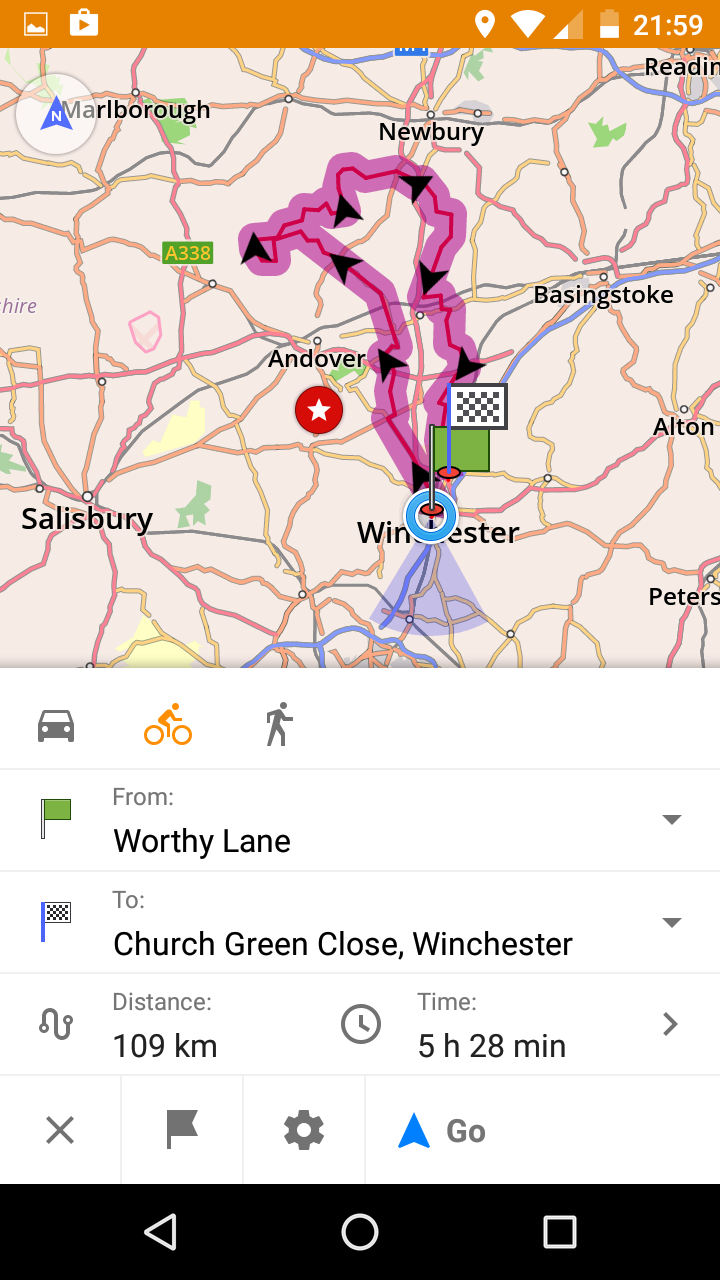 But if you prefer turn-by-turn directions, with voice prompts, you need to tap the curved arrow icon at the bottom towards the left). A menu will pop up asking whether you want to use the displayed track for navigation. Tap yes, and you’ll see a mini-map with your planned route highlighted in purple. The first time you do this, you’ll want to set some default options for cycling. Make sure the bike icon is highlighted above the From: and To: addresses. Tap the cog icon at the bottom of the screen. Set options as follows:
- Voice guidance
- Select the voice you downloaded in the previous section.
- Pass along entire track
- Make sure this is NOT ticked, however tempting!
- Calculate OsmAnd route for first and last route segment
- Ticked.
And then tap Navigation settings, check that the following screen references Bicycle at the top, and then select Navigation options as follows:
- Avoid
- I suggest you tick Avoid motorways and Avoid stairs, but suit yourself!
- Snap to road
- I have always had this ticked (which is the default) but as I write, it occurs to me that unticked might be better, especially if you are taking off-road routes.
- Announce
- I generally untick all except GPX waypoints.
- Unit of speed
- Your choice.
- Turn screen on
- This allows OsmAnd to turn on the screen when you are approaching a turn, and specifies how long to leave it turned on. It’s worth selecting a time here, e.g. 30 seconds, even if you generally intend to keep the screen turned on permanently as discussed under Battery Life. You will then be asked to Activate device administrator for lock screen; tap Activate at the bottom of the screen.
Back-arrow to the navigation screen and tap Go next to the blue arrow.
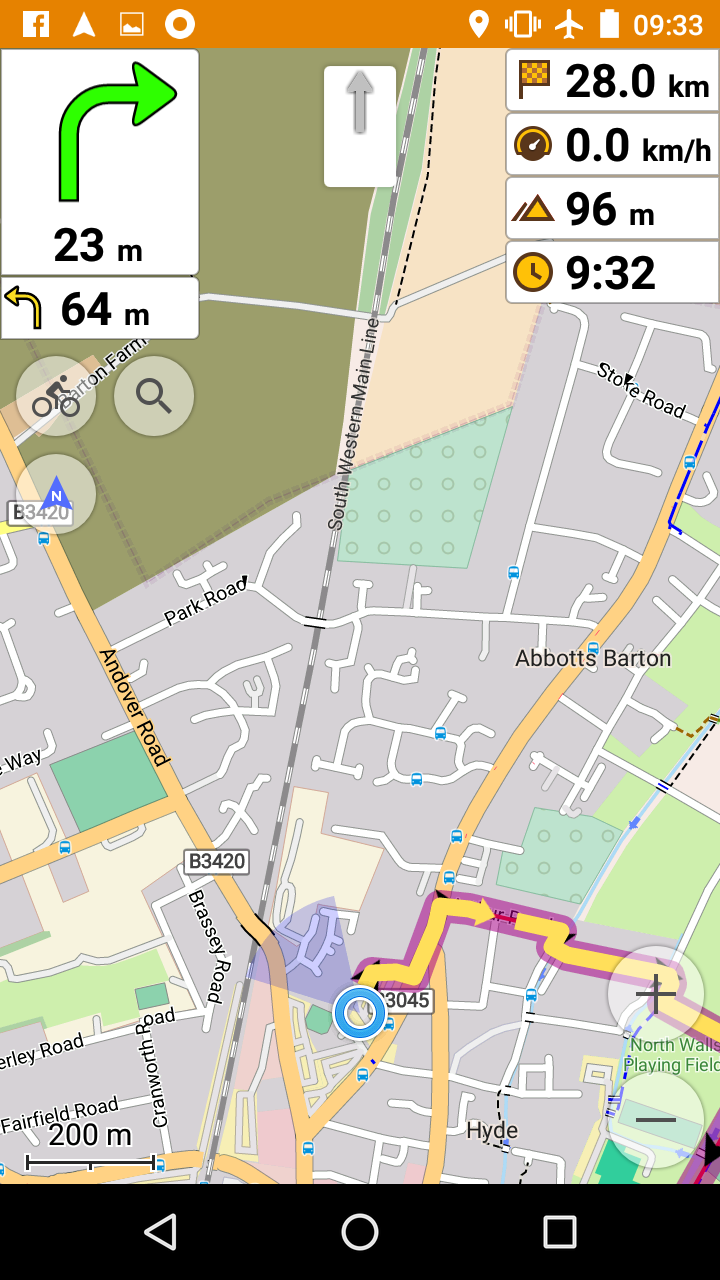
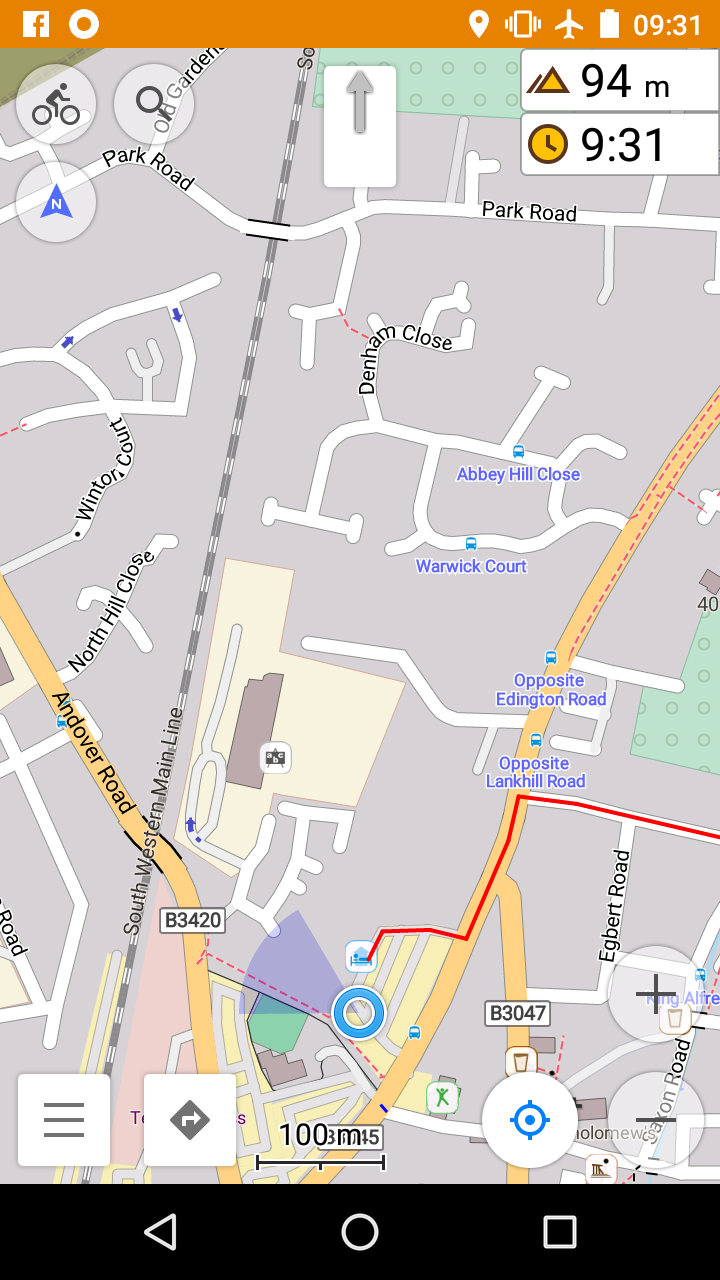
You are now in turn-by-turn mode. The fat purple line shows your route, with yellow arrows indicating turns. An icon on the left-middle of the screen controls the orientation of the map. It has three options: North up, To direction of movement, or To compass. The menu and navigation icons at bottom left will disappear after a short while, to give you a clearer view of the map, but you can make them re-appear by tapping anywhere on the map.
One thing you might want to configure is the display at the top-right of the routing screen. By default you get distance to destination, OsmAnd’s estimated arrival time, speed and altitude. To select different display data, tap Menu and then Configure screen. You can turn off the default data items, and add preferred items to your heart’s content. There are similar options for the navigation display in the left panel, which by default shows distance to and direction of the next turn (and below that the second next turn).
If you want to stop navigation, tap on the map to make the icons at bottom left reappear, tap the blue arrow, and then X in the bottom left to dismiss the route.
One important note. If you are resuming a GPX track part-way through, you will want to set the From: location to ‘My Position’ rather than the beginning of the track.
Ad-hoc Routing
So far, so good. We’ve installed OsmAnd and used it to follow a pre-planned route. But now we want to divert and find food, or a hotel, or a bus stop. There are three main ways I do this: search by category, free-text search, or directly selecting a point on the map.
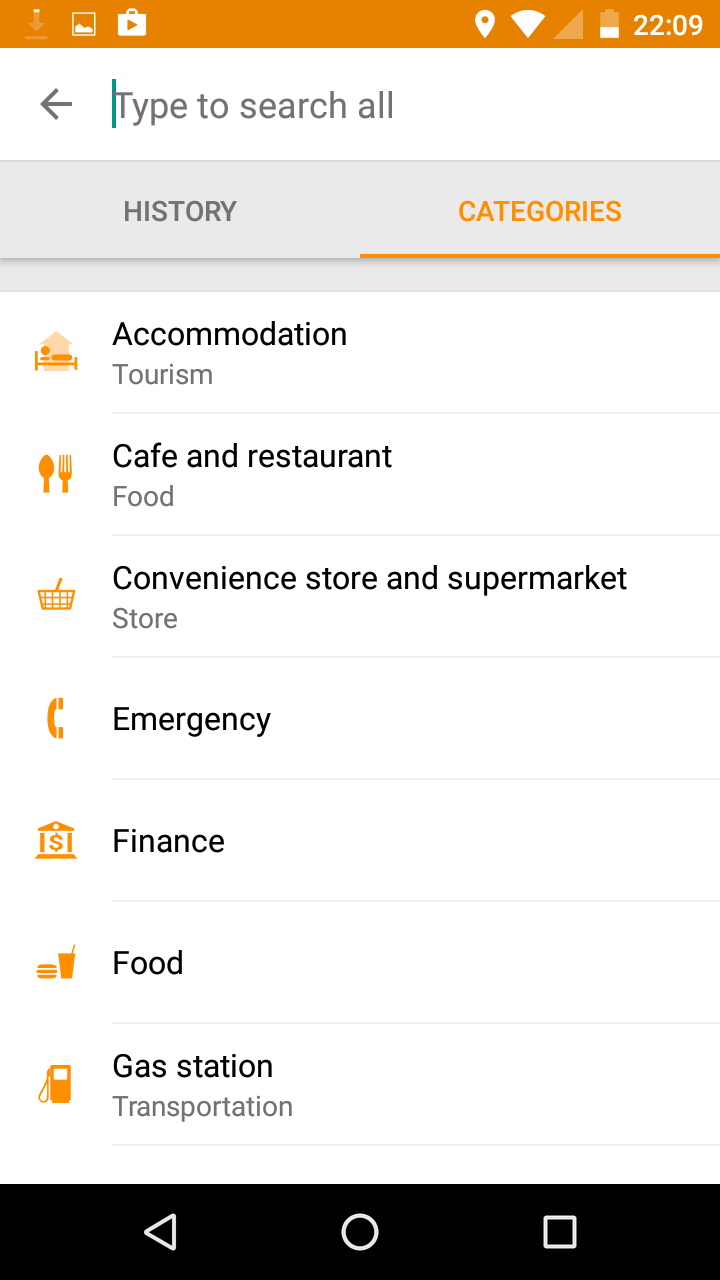
- Search by category
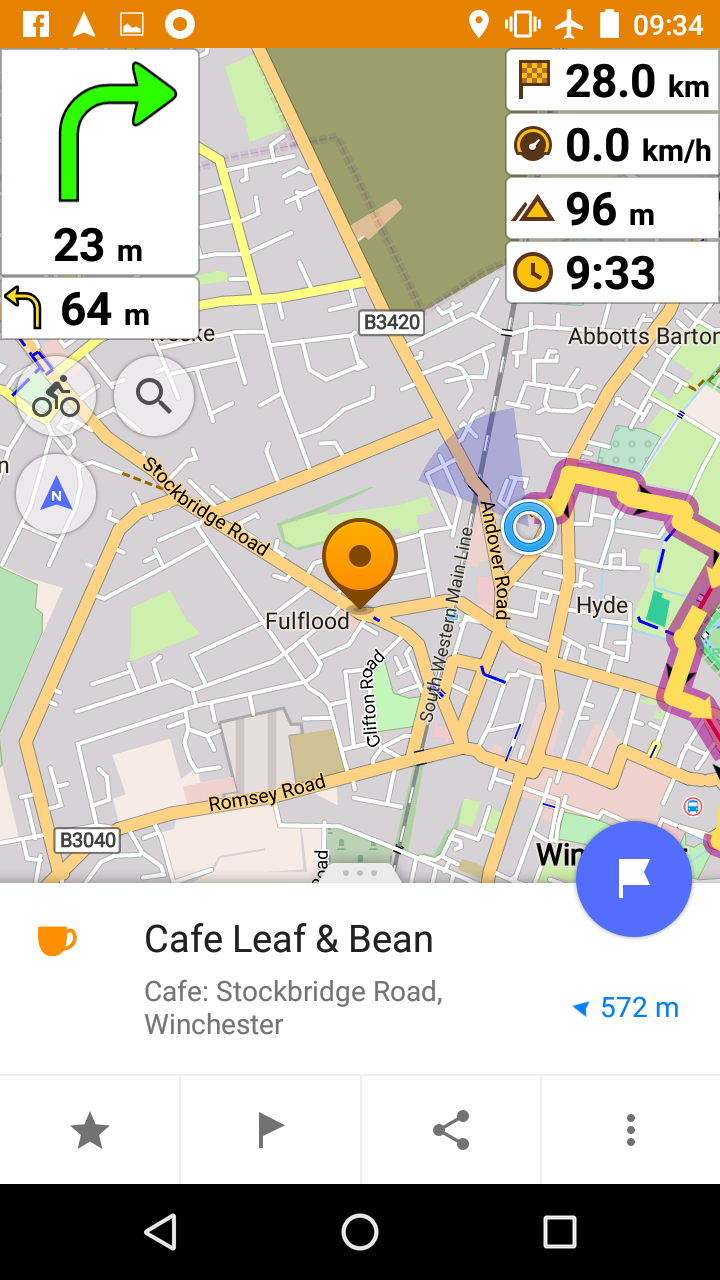
- Tap Menu, then Search, then Categories, and you will see a list of categories e.g. Cafe and restaurant. Tap a category and you will see a list of items of this category, in this case restaurants, ordered closest first. I found this absolutely brilliant on TCR, when I would frequently need to know where is the closest food store, or restaurant, or filling station, or hotel. You will even find opening hours for some items, if the good people of OSM have captured this information. Now tap one of the items and you’ll be taken back to the map, with a push-pin marker showing the location of that item. If you want to go there, tap the blue arrow or blue flag (depends whether you are currently in turn-by-turn routing), and OsmAnd will choose a route and present it to you. Just tap Go and you’ll get turn-by-turn directions.
- Free-text search
- Tap Menu, then Search. At the top of the Search screen is a free-text entry box. You can type pizza or parking or Brighton or Acacia Avenue or doctors… whatever you want. OsmAnd will do a text search across all items and display them below in order of distance from your current location. Tap an item in the search results and it might take you into a more detailed list of search items, e.g. tapping Brighton will show a list of Brighton street names. Alternatively, if you tap a specific item such as Pizza Express, Bridge Street, Winchester, it will take you to the map with the usual push-pin marker and blue arrow/flag.
- Directly select a point on the map
- If you know where you want to go, and you can find it on the map, just long-press on the map, and the usual push-pin will appear, with an invitation to route to that point.
 OsmAnd’s route selection seems pretty good. I wouldn’t trust it to plan an all-day route; I’d definitely want to review that on a large screen map ahead of time. But for short, spontaneous diversions it seems to pick sensible cycling routes (obviously assuming you’ve set suitable options such as Avoid Motorways).
Recording rides
Many of us want to record our rides, e.g. to upload to Strava. OsmAnd has a free plugin to record a GPX file of your ride. I would imagine it’s a pretty battery-efficient way to do it, given you’re already using OsmAnd for navigation. But I don’t use it as a rule, instead I use the Strava app for Android. The reason is simply that the Strava app makes it so easy to upload its track at the end of a ride, whereas uploading a GPX file captured by a different device is a bit fiddly (you have to use a web browser to visit strava.com and repeatedly say ‘no, I don’t want to use the Strava app’).
The Strava app is pretty battery-efficient (I understand it uses around 2% of battery per hour) so it’s no big deal, but perhaps one day I’ll experiment with using OsmAnd to capture ride logs. If you want to do this: Menu, Plugins, Trip recording, three-dots, Enable. You’ll then see an additional item ‘GPX’ on the top right of the map. Tap this and the circle next to GPX will light up in red and you are capturing a track.
Other cool features
There is a plugin for Contour lines. I’ve never tried it. I think you need the plugin enabled, and also you need to download the contour data for the relevant country, so it will count as an additional one of your ten downloads if you are sticking with the free version of the app.
 Points of Interest (POIs): You can choose to display markers for categories of interest. For instance, on TCR when I had a non-urgent need for an ATM, I wouldn’t necessarily search for a specific one and then route to it, but instead turn on POI display for category:Finance, and then keep an eye on the map in case I passed near a bank. To enable display of POIs: Menu, Configure map, POI, select category. If you want to display more than one category of POI at the same time, you need to tap the double-tick icon at bottom-left whereupon tick boxes will appear alongside the categories.
From the Download maps menu option, you can also download Wikipedia data for each country (this feature is available only in OsmAnd+). You then have the option to display these as POIs on the map, and tap for additional text. I guess this could be very useful if you are touring and want to access interesting facts about landmarks you see along the way.
Favourites: You can create your own list of favourite locations, and then use them as routing destinations. Any time you see a push-pin marker on the screen, e.g. after a search, or after directly-selecting a point on the map, there should be a five-pointed star at bottom left. Tap that and you will be invited to add this point as a favourite. I added all the TCR checkpoints and parcours as favourites. If you have coordinates of multiple favourites like TCR checkpoints, a quicker way is to create a GPX file of these points and open the file in OsmAnd. This document describes a way to do this.
Map updates: There is a very active community constantly making improvements so it’s well worth updating your downloaded maps from time to time (Menu, Download maps, Update).
Alternative offline routers: OsmAnd has an architecture to allow alternative routing engines to be plugged-in. You set up your preferred routing engine via Menu, Settings, Navigation settings, Navigation service. OSMAND is the only out-of-the-box offline router that supports bikes, so it’s the obvious choice and does a good job. But my favourite web routing engine, brouter, also offers an offline engine for installation in OsmAnd. I briefly tried this and couldn’t immediately make it work, but it’s worth knowing that alternatives do exist.
Quirks and annoyances
I already mentioned the issue of occasional turns that are not announced (because the fork goes straight ahead) and more often, random bends on the road being announced as turns. As far as I can see, OSM doesn’t seem to have a way to model the dashed white lines at a junction that indicate right-of-way, so it simply relies on the shape of the road to guess. It’s a pretty common issue for all navigation systems.
A related problem is that the voice announcements try to describe the approach, entry and exit from a roundabout using only the words left and right. There’s no enter roundabout and leave by the third exit. Of course it’s perfectly clear when you look on the map, but the voice announcements alone can be misleading.
When you are navigating a GPX track turn-by-turn, but you go off-route, OsmAnd tends to be quite persistent in telling you to go back and complete the whole planned route. Of course, by looking at the map you have probably found a way to divert then re-converge with the route a little further down the road. OsmAnd may panic but you shouldn’t! Just keep navigating to the convergence point and OsmAnd will eventually calm down and recognise that you are back on track.
As I already mentioned, when you install OsmAnd+ (to lift restrictions on number of downloads) after starting out with free OsmAnd, you will need to repeat the initial configuration, and download maps once again. In this case you will most likely want to uninstall free OsmAnd and delete its associated folders, to save storage space on your phone.
I haven’t found a way to show a profile of elevation along the route. When I used Garmin, I used to torture myself by looking at the elevation profile and watching my slow progress towards the top of a hill. Unless I’ve overlooked it, it seems OsmAnd doesn’t allow that masochistic experience.
Summary and recommendation
I heartily recommend OsmAnd+ for navigating long-distance cycling events. Compared to the Garmin devices I have owned, I find it has a larger and clearer display, fewer software problems, and it has powerful and easy-to-use features for ad-hoc routing on the move. I ran OsmAnd+ on an inexpensive phone, which I would in any case have taken on TCR for communication, thus potentially saving one device. That said, I would still recommend TCR competitors have a backup navigation device of some form.
I’d really like a fully waterproof bag to protect phone, battery pack and USB charging connections, so I could retire my hotel shower caps! This remains my biggest concern.
I’m very interested to hear your thoughts on this subject. Have you tried OsmAnd? Was it successful for you? Have you solved the bike-mounting issue? Is there anything I haven’t described clearly? Please use comments to provide feedback.